GST: Difference between revisions
| (7 intermediate revisions by the same user not shown) | |||
| Line 48: | Line 48: | ||
#* Local calls – TX @9% GST | #* Local calls – TX @9% GST | ||
=== Example 1: Setup a | === Example 1: Setup a Product with Proper Input Tax and Output Tax === | ||
# Setup the Tax Types and Tax Groups as described in the earlier sections. In this example, we use 3 products: redpen, orangepen, and greenpen. | |||
#Setup the Tax Types and Tax Groups as described | # Identify the GST treatment for both Sales and Purchase of each product (See Table 1 below). Assume the prevailing GST rate is 9%, and 0% for GST-exempt items. These rates may change over time. | ||
#Identify the | ## redpen: Sales GST = SR @9%, Purchase GST = TX @9% | ||
##redpen | ## orangepen: Sales GST = ZR @0%, Purchase GST = ZP @0% | ||
##orangepen | ## greenpen: Sales GST = NA @0%, Purchase GST = NA @0% | ||
##greenpen | # Set up Item Tax Types: | ||
# | ## Provide a clear name for the tax type, such as '''"Items Taxable (Sales-Purch) - SR and TX 9%"''' (for redpen). | ||
## | ## Set '''Is Fully Tax-exempt:''' to '''No'''. | ||
## | ## In the "Select which taxes this item tax type is exempt from" list, check all boxes except '''SR''' and '''TX'''. | ||
## | ## Click the '''Add New''' button to save. | ||
##Click | ## Repeat the above steps to create additional Item Tax Types for ZR/ZP (for orangepen) and NA/NA (for greenpen). | ||
##Repeat the above steps for ZR/ZP and NA/NA. | # Assign the Item Tax Types to products: | ||
#Go to Inventory Mgt | ## Go to: Inventory Mgt > Maintenance > Add and Edit Items. | ||
##Select the redpen. | ## Select the product '''redpen'''. | ||
## | ## In the '''Item Tax Type''' field, choose '''"Items Taxable (Sales-Purch) - SR and TX 9%"''' from the dropdown list. | ||
##Click on Update | ## Click on '''Update Item'''. | ||
##Repeat for orangepen and greenpen | ## Repeat the process for '''orangepen''' and '''greenpen''' using their respective Item Tax Types. | ||
# | # Assign the appropriate Tax Group to the customer (or supplier): | ||
# | ## Go to: Sales Mgt > Maintenance > Add and Edit Customer Records. | ||
[[File:Itemtaxsetup.png|none|thumb|800x800px|Fig 4. | ## Select the customer and then select the appropriate branch. | ||
[[File:CustTaxGroup.png|none|thumb|800x800px|Fig 5. | ## In the branch record, choose the relevant Tax Group from the dropdown, e.g. '''"Sales Tax SR-OS-ZR-NA"'''. | ||
## Click on the '''Update''' button to save. | |||
# Once all the above setups are complete, you can proceed to create a sales invoice. The system will automatically apply the correct GST based on the product’s Item Tax Type and the customer's Tax Group settings. | |||
'''<u>Table 1: Products with Sales and its corresponding Purchase tax codes:</u>''' | |||
{| class="wikitable" | |||
!'''Product''' | |||
!'''Sales''' | |||
!'''Purchase''' | |||
|- | |||
|redpen | |||
|SR | |||
|TX | |||
|- | |||
|organgepen | |||
|ZR | |||
|ZP | |||
|- | |||
|greenpen | |||
|NA | |||
|TXNA/NA | |||
|- | |||
|Prod 4 | |||
|OS | |||
|OP | |||
|} | |||
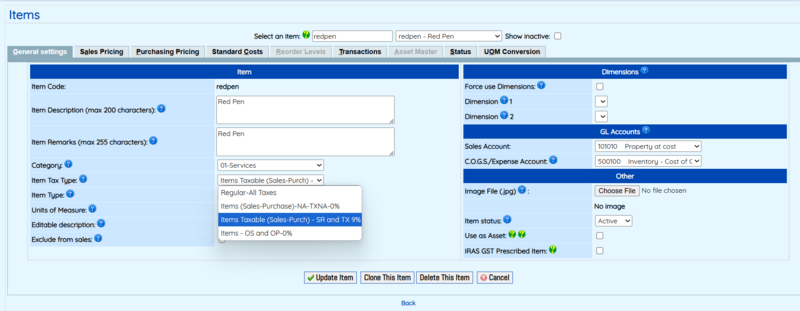
[[File:Itemtaxsetup.png|none|thumb|800x800px|Fig 4. Screen showing how to update the item tax type for redpen.]] | |||
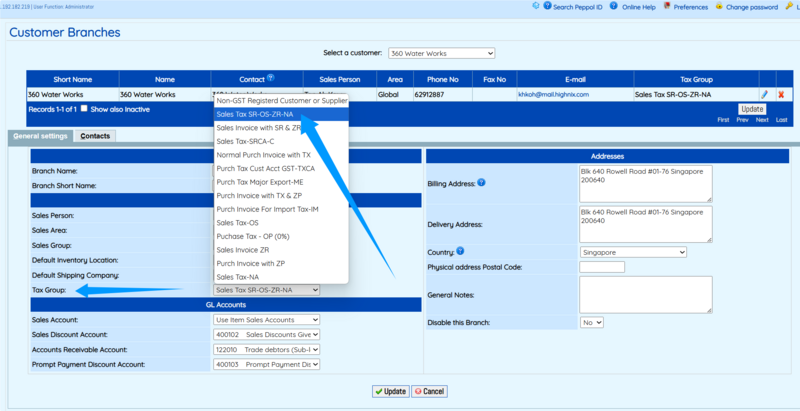
[[File:CustTaxGroup.png|none|thumb|800x800px|Fig 5. Customer Tax Group selection.]] | |||
=== Example 2: Processing Multiple GST Types in One Invoice === | |||
'''I have a bill from a telco. Local calls are subject to GST, but overseas calls are exempt. These transactions are billed together. How do I set this up and record it?''' | '''I have a bill from a telco. Local calls are subject to GST, but overseas calls are exempt. These transactions are billed together. How do I set this up and record it?''' | ||
Highnix ERP can easily handle this common scenario, which is often challenging for users of less flexible systems. In cases where different GST treatments apply within the same bill—such as taxable local calls and GST-exempt overseas calls—Highnix allows for a simple one-time setup. This setup can then be reused across different vendors, customers, and products. | Highnix ERP can easily handle this common scenario, which is often challenging for users of less flexible systems. In cases where different GST treatments apply within the same bill—such as taxable local calls and GST-exempt overseas calls—Highnix allows for a simple one-time setup. This setup can then be reused across different vendors, customers, and products. | ||
'''Step 1: Set up a Tax Group''' | |||
# Go to: System Setup > GST Tax Group. | # Go to: System Setup > GST Tax Group. | ||
# Create a new tax group and name it '''"Purch Invoice with TX & ZP"'''. | # Create a new tax group and name it '''"Purch Invoice with TX & ZP"'''. | ||
# Under "Select the taxes that are included in this group", check the boxes for "TX" and "ZP". | # Under "Select the taxes that are included in this group", check the boxes for "TX" and "ZP". | ||
# Save the tax group. | # Save the tax group. | ||
'''Step 2: Set up an Item Tax Exemption Type''' | |||
# Go to: System Setup > Item Tax Exemption Type. | # Go to: System Setup > Item Tax Exemption Type. | ||
# Create a new exemption type named '''"Items Not Taxable – ZP and ZR 0%"'''. | # Create a new exemption type named '''"Items Not Taxable – ZP and ZR 0%"'''. | ||
# Under "Select which taxes this item tax type is exempt from", check all boxes except "ZP" and "ZR". | # Under "Select which taxes this item tax type is exempt from", check all boxes except "ZP" and "ZR". | ||
# Save the exemption type. | # Save the exemption type. | ||
'''Step 3: Set up a Taxable Item Tax Type''' | |||
# Go to: System Setup > Item Tax. | # Go to: System Setup > Item Tax. | ||
# Create a new tax type named '''"Items Taxable – SR and TX @ Prevailing Rate"'''. | # Create a new tax type named '''"Items Taxable – SR and TX @ Prevailing Rate"'''. | ||
# Under "Select which taxes this item tax type is exempt from", check all boxes except "SR" and "TX". | # Under "Select which taxes this item tax type is exempt from", check all boxes except "SR" and "TX". | ||
# Save the tax type. | # Save the tax type. | ||
'''Step 4: Create a Supplier Record''' | |||
# Go to: Purchase Mgt > Maintenance > Add and Edit Supplier Records. | # Go to: Purchase Mgt > Maintenance > Add and Edit Supplier Records. | ||
# Enter the supplier’s name as '''"Telephone Company"'''. | # Enter the supplier’s name as '''"Telephone Company"'''. | ||
# In the Tax Group drop-down, select '''"Purch Invoice with TX & ZP"'''. | # In the Tax Group drop-down, select '''"Purch Invoice with TX & ZP"'''. | ||
# Save the supplier record. | # Save the supplier record. | ||
'''Step 5: Create Product Items''' | |||
# Go to: Inventory/Product Mgt > Maintenance > Add and Edit Items. | # Go to: Inventory/Product Mgt > Maintenance > Add and Edit Items. | ||
# Create a product named '''"Local Phone Calls"'''. | # Create a product named '''"Local Phone Calls"'''. | ||
| Line 108: | Line 129: | ||
# In the Item Tax Type field, select '''"Items Not Taxable – ZP and ZR 0%"'''. | # In the Item Tax Type field, select '''"Items Not Taxable – ZP and ZR 0%"'''. | ||
# Save both products. | # Save both products. | ||
'''Step 6: Enter a Purchase Bill''' | |||
# Go to: Purchase Mgt > Create Bills. | # Go to: Purchase Mgt > Create Bills. | ||
# Select the supplier '''"Telephone Company"'''. | # Select the supplier '''"Telephone Company"'''. | ||
| Line 125: | Line 145: | ||
== <span id="GST9">'''Chnage of GST'''</span> == | == <span id="GST9">'''Chnage of GST'''</span> == | ||
=== | ===Starting year 2024, the GST will be changed from 8% to 9%, how do I go about changing it?[[#GST9|Tag:#GST9]] === | ||
The GST rate in Singapore will increase from 8% to 9% on January 1, 2024. GST-registered users can follow these simple steps to change the Sales and Purchase GST from 8% to 9%: | The GST rate in Singapore will increase from 8% to 9% on January 1, 2024. GST-registered users can follow these simple steps to change the Sales and Purchase GST from 8% to 9%: | ||
Latest revision as of 12:44, 16 June 2025
GST SETUP
Tax Type Setup
- As the name suggests, this function is used to define the types of tax applied in transactions. In Singapore, these tax types—also known as IRAS Tax Codes—are standardized by the Inland Revenue Authority of Singapore and detailed in the E-Tax Guides available on the IRAS website.
- Common examples of tax codes include: SR, ZR, TX, ZT, etc. (see Fig 1 below). Highnix comes with several predefined tax codes in the default database to help you get started quickly.
- How to use:
- To access this feature, navigate to: System Setup → Company Setup → GST Type Setup (Fig 1)
- To add a new tax type, simply fill out the form located directly below the tax type listing table.
- Note: The same General Ledger (GL) code can be used for both Sales and Purchase accounts, if appropriate.
- To edit or delete, click on the icons on the extremem right.
Tax Group Setup
A Tax Group is used during the setup of customer or supplier profiles. It serves as a way to group multiple tax types (whether for sales or purchases) into a single, manageable entity. This is especially useful when dealing with products or services that are subject to different tax codes.
Highnix's Tax Group feature helps reduce human error by automating tax application during transactions. Since the tax group is assigned at the customer or supplier level by authorized personnel, it prevents users from accidentally selecting incorrect tax types when entering sales or purchase transactions.
How to Use
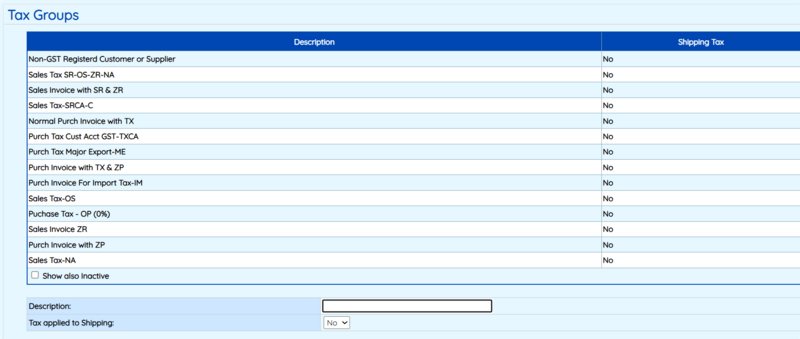
- To access this feature, go to: System Setup → Company Setup → GST Tax Group (See Fig 2)
- To create a new tax group, use the form located below the table.
- When creating a new group:
- Enter a meaningful group name.
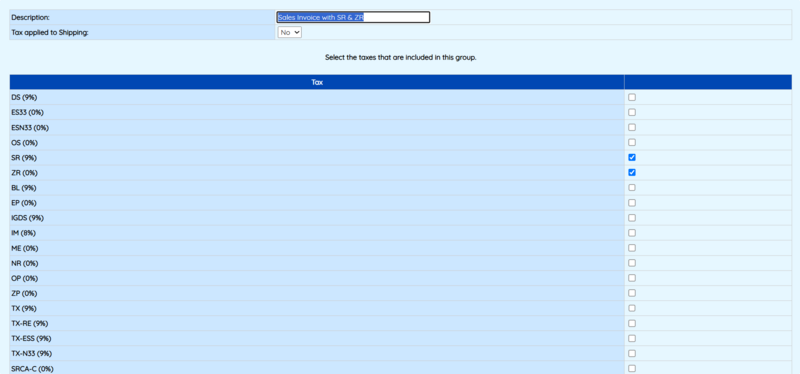
- Select the relevant tax types to be included in this group (See Fig 3).
- Once the group is created and assigned to a customer or supplier, Highnix will automatically apply the correct tax codes for products that match the group’s tax configuration. This ensures consistency and accuracy in both Sales and Supplier Invoices.
Item Tax Exemption Setup
- This setup is used for products that are "exempted" from tax. It is important for two types of products:
- Products that are exempted from all tax types. When a product is classified for exemption for all taxes, that means, there will be no tax at all. This type of scenario may happen in some countries only.
- Products that are exempted from some tax types. This is a crucial step that product GST should be setup correctly so that the correct GST is applied.
- When used together with Tax Groups, this feature allows invoices to include multiple tax types if they contain products subject to different GST treatments.
- For example, a customer may purchase three products with the following GST breakdown. With item tax exemption configured, an invoice can reflect all three tax types accurately.
- Red Pen – SR @9% GST
- Orange Pen – ZR @0% GST (Zero-Rated)
- Green Pen – NA @0% GST (Not Applicable or Exempt)
- Note: When setup a product item with proper tax type, it is important to setup the item tax correctly. Each product should have 1 GST tax type for Sales and 1 GST tax type for Purchase respectively. Please see below Example 1 for setting up a product with proper Input Tax and Out Tax.
- Another example is a telecommunications bill with different types of GST applied. This can be easily pre-configured, so that future entries follow the defined setup. We will show how taxes can be configured for a telco bill (See "Example: Processing Multiple GST Types in One Invoice" below).
- Overseas calls – No GST
- Local calls – TX @9% GST
Example 1: Setup a Product with Proper Input Tax and Output Tax
- Setup the Tax Types and Tax Groups as described in the earlier sections. In this example, we use 3 products: redpen, orangepen, and greenpen.
- Identify the GST treatment for both Sales and Purchase of each product (See Table 1 below). Assume the prevailing GST rate is 9%, and 0% for GST-exempt items. These rates may change over time.
- redpen: Sales GST = SR @9%, Purchase GST = TX @9%
- orangepen: Sales GST = ZR @0%, Purchase GST = ZP @0%
- greenpen: Sales GST = NA @0%, Purchase GST = NA @0%
- Set up Item Tax Types:
- Provide a clear name for the tax type, such as "Items Taxable (Sales-Purch) - SR and TX 9%" (for redpen).
- Set Is Fully Tax-exempt: to No.
- In the "Select which taxes this item tax type is exempt from" list, check all boxes except SR and TX.
- Click the Add New button to save.
- Repeat the above steps to create additional Item Tax Types for ZR/ZP (for orangepen) and NA/NA (for greenpen).
- Assign the Item Tax Types to products:
- Go to: Inventory Mgt > Maintenance > Add and Edit Items.
- Select the product redpen.
- In the Item Tax Type field, choose "Items Taxable (Sales-Purch) - SR and TX 9%" from the dropdown list.
- Click on Update Item.
- Repeat the process for orangepen and greenpen using their respective Item Tax Types.
- Assign the appropriate Tax Group to the customer (or supplier):
- Go to: Sales Mgt > Maintenance > Add and Edit Customer Records.
- Select the customer and then select the appropriate branch.
- In the branch record, choose the relevant Tax Group from the dropdown, e.g. "Sales Tax SR-OS-ZR-NA".
- Click on the Update button to save.
- Once all the above setups are complete, you can proceed to create a sales invoice. The system will automatically apply the correct GST based on the product’s Item Tax Type and the customer's Tax Group settings.
Table 1: Products with Sales and its corresponding Purchase tax codes:
| Product | Sales | Purchase |
|---|---|---|
| redpen | SR | TX |
| organgepen | ZR | ZP |
| greenpen | NA | TXNA/NA |
| Prod 4 | OS | OP |
Example 2: Processing Multiple GST Types in One Invoice
I have a bill from a telco. Local calls are subject to GST, but overseas calls are exempt. These transactions are billed together. How do I set this up and record it?
Highnix ERP can easily handle this common scenario, which is often challenging for users of less flexible systems. In cases where different GST treatments apply within the same bill—such as taxable local calls and GST-exempt overseas calls—Highnix allows for a simple one-time setup. This setup can then be reused across different vendors, customers, and products.
Step 1: Set up a Tax Group
- Go to: System Setup > GST Tax Group.
- Create a new tax group and name it "Purch Invoice with TX & ZP".
- Under "Select the taxes that are included in this group", check the boxes for "TX" and "ZP".
- Save the tax group.
Step 2: Set up an Item Tax Exemption Type
- Go to: System Setup > Item Tax Exemption Type.
- Create a new exemption type named "Items Not Taxable – ZP and ZR 0%".
- Under "Select which taxes this item tax type is exempt from", check all boxes except "ZP" and "ZR".
- Save the exemption type.
Step 3: Set up a Taxable Item Tax Type
- Go to: System Setup > Item Tax.
- Create a new tax type named "Items Taxable – SR and TX @ Prevailing Rate".
- Under "Select which taxes this item tax type is exempt from", check all boxes except "SR" and "TX".
- Save the tax type.
Step 4: Create a Supplier Record
- Go to: Purchase Mgt > Maintenance > Add and Edit Supplier Records.
- Enter the supplier’s name as "Telephone Company".
- In the Tax Group drop-down, select "Purch Invoice with TX & ZP".
- Save the supplier record.
Step 5: Create Product Items
- Go to: Inventory/Product Mgt > Maintenance > Add and Edit Items.
- Create a product named "Local Phone Calls".
- In the Item Tax Type field, select "Items Taxable – SR and TX @ Prevailing Rate".
- Create another product named "Overseas Phone Calls".
- In the Item Tax Type field, select "Items Not Taxable – ZP and ZR 0%".
- Save both products.
Step 6: Enter a Purchase Bill
- Go to: Purchase Mgt > Create Bills.
- Select the supplier "Telephone Company".
- Add both products: "Local Phone Calls" and "Overseas Phone Calls".
- Save the bill.
With this setup, Highnix will automatically apply the correct GST treatment to each item—taxable or non-taxable—within the same invoice.
Note: This configuration can also be used for sales invoices. If you need to invoice both taxable and non-taxable products or services in a single sales invoice, follow the same steps above, but instead of creating a purchase bill, create a sales invoice.
Chnage of GST
Starting year 2024, the GST will be changed from 8% to 9%, how do I go about changing it?Tag:#GST9
The GST rate in Singapore will increase from 8% to 9% on January 1, 2024. GST-registered users can follow these simple steps to change the Sales and Purchase GST from 8% to 9%:
- Go to the System Setup, GST Type Setup.
- Click on edit icon (pencil) on the right of the corresponding tax type. The tax item will appear on the form at the bottom of the listing.
- Change the default rate to 9%.
- Click on the Update button.
- Repeat the above for the rest of the tax types. Note that for 0% tax, user could leave it unchnage.
Note: Highnix ERP records the value of GST at the point when a Sales Invoice (or Purchase Invoice for supplier) is created. If you create a Sales Order or Delivery before the GST rate is updated, you can still change the GST to the correct rate just before the invoices are created.
The next task is to change the descriptions of the tax group and the account descriptions. This is only necessary if the descriptions include the GST rates. For example, if the description of your GST type shows "Normal Sales Invoice with SR-7%", it is best to remove the "-7%" because it is confusing to put the rates there. Similarly, if the description of the account code shows "Output GST Collected-SR-7%", you should remove the "-7%".
To change the description, follow these steps:
- Tax group:
- Go to System Setup > GST Tax Groups.
- Click on the edit icon (pencil) on the right of the corresponding tax group. The tax group details will appear on the form at the bottom of the listing.
- Remove the "-X%" from the description.
- Click on the Update button.
- Repeat the above for the rest of the tax groups.
- Account code:
- Go to Finance Mgt > Maintenance > GL Chart of Account.
- Locate the account code from the drop down menu. (Users can type the account code if they know, the default GST account codes are beginning with "22".)
- Under the Account Name description, remove the rates.
- Click on the Update Account button.


